Example: WebApp flow under test
Objective
Show how to move from recording to distributed execution using a real user flow from an online store web application:
recording -> correlation -> editing -> debug -> local run -> distributed run.
Before starting, install the Relampo CLI here: https://relampo.com/cli-install/.
Test case
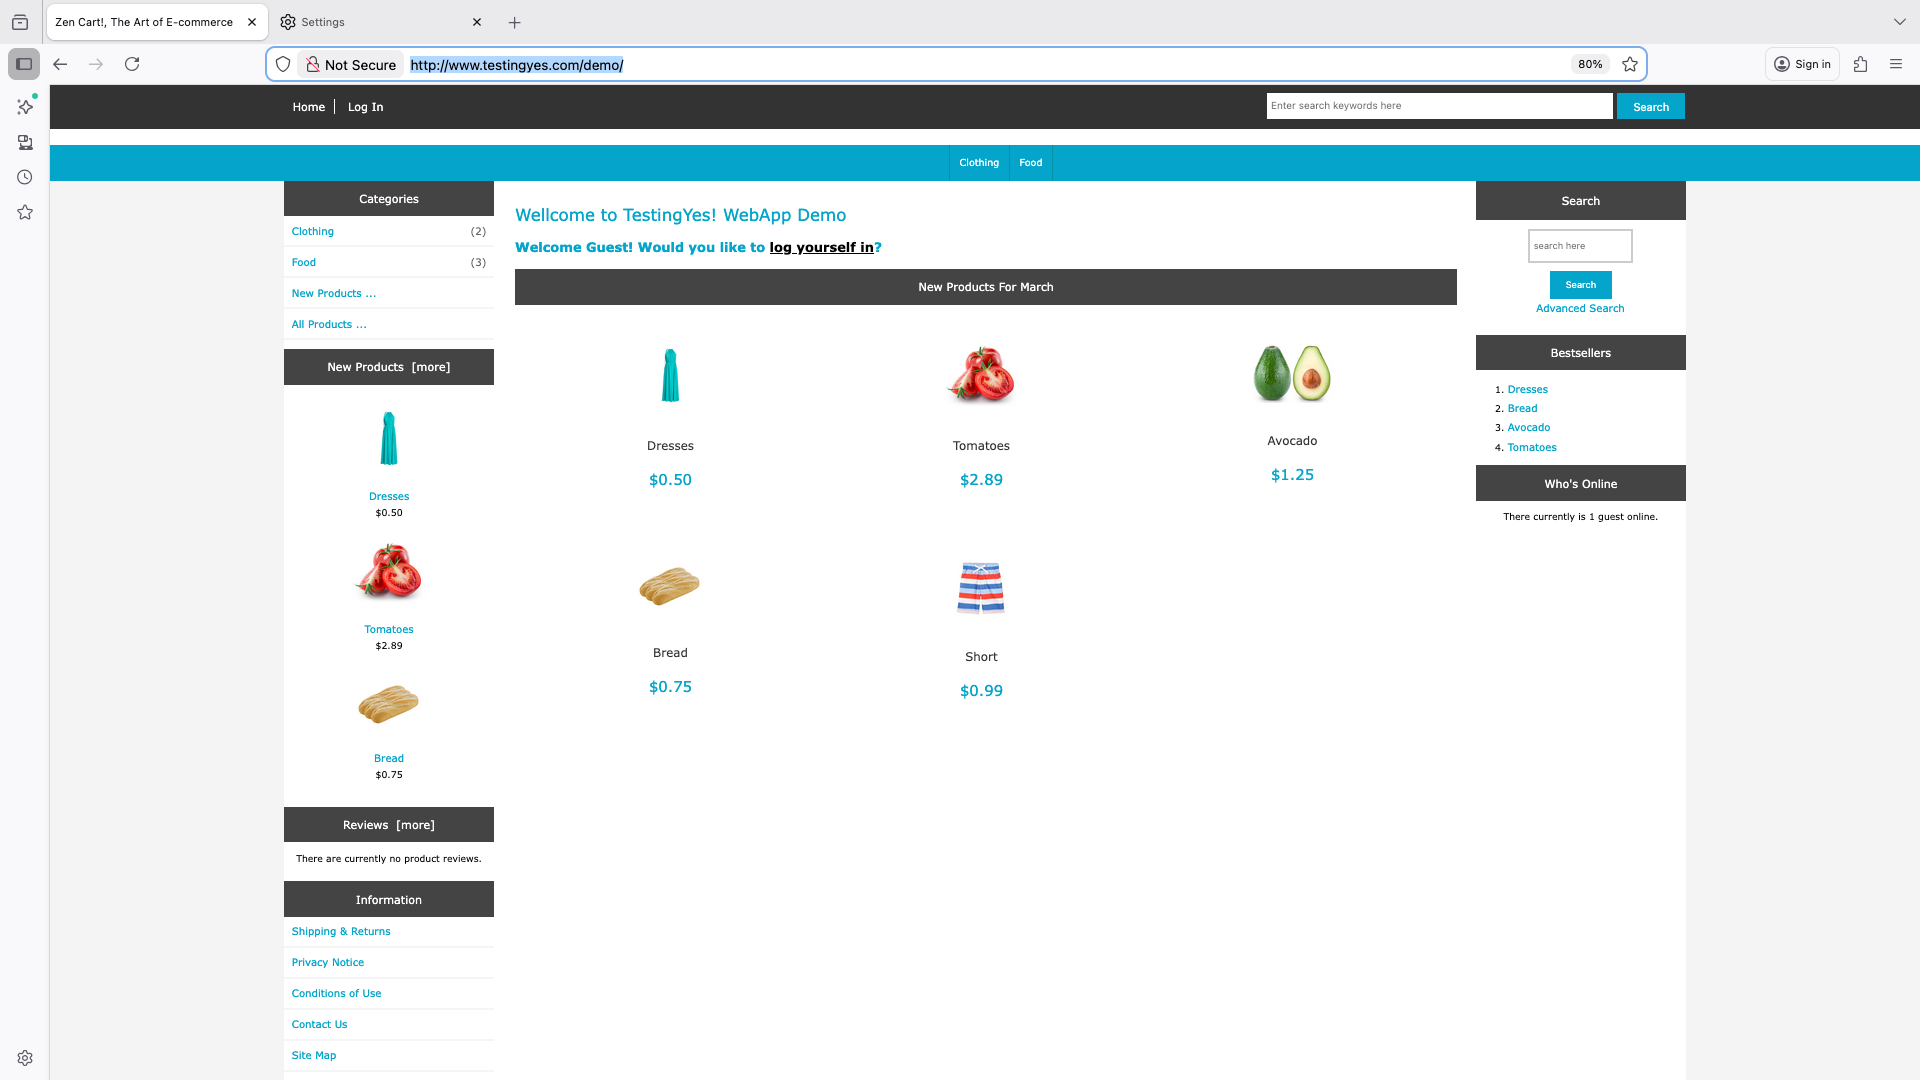
- Application:
http://www.testingyes.com/demo/ - Test user: Contact us to assign a test user.
- Test password: Contact us to assign a test password.
- Flow to record:
- Open HomePage.
- Click Login.
- Enter the credentials provided by the Relampo team.
- Select a product (for example: avocado, tomato, or bread).
- Complete the purchase by going through all screens until order confirmation.
- Log out of the app.
1) Record real flow
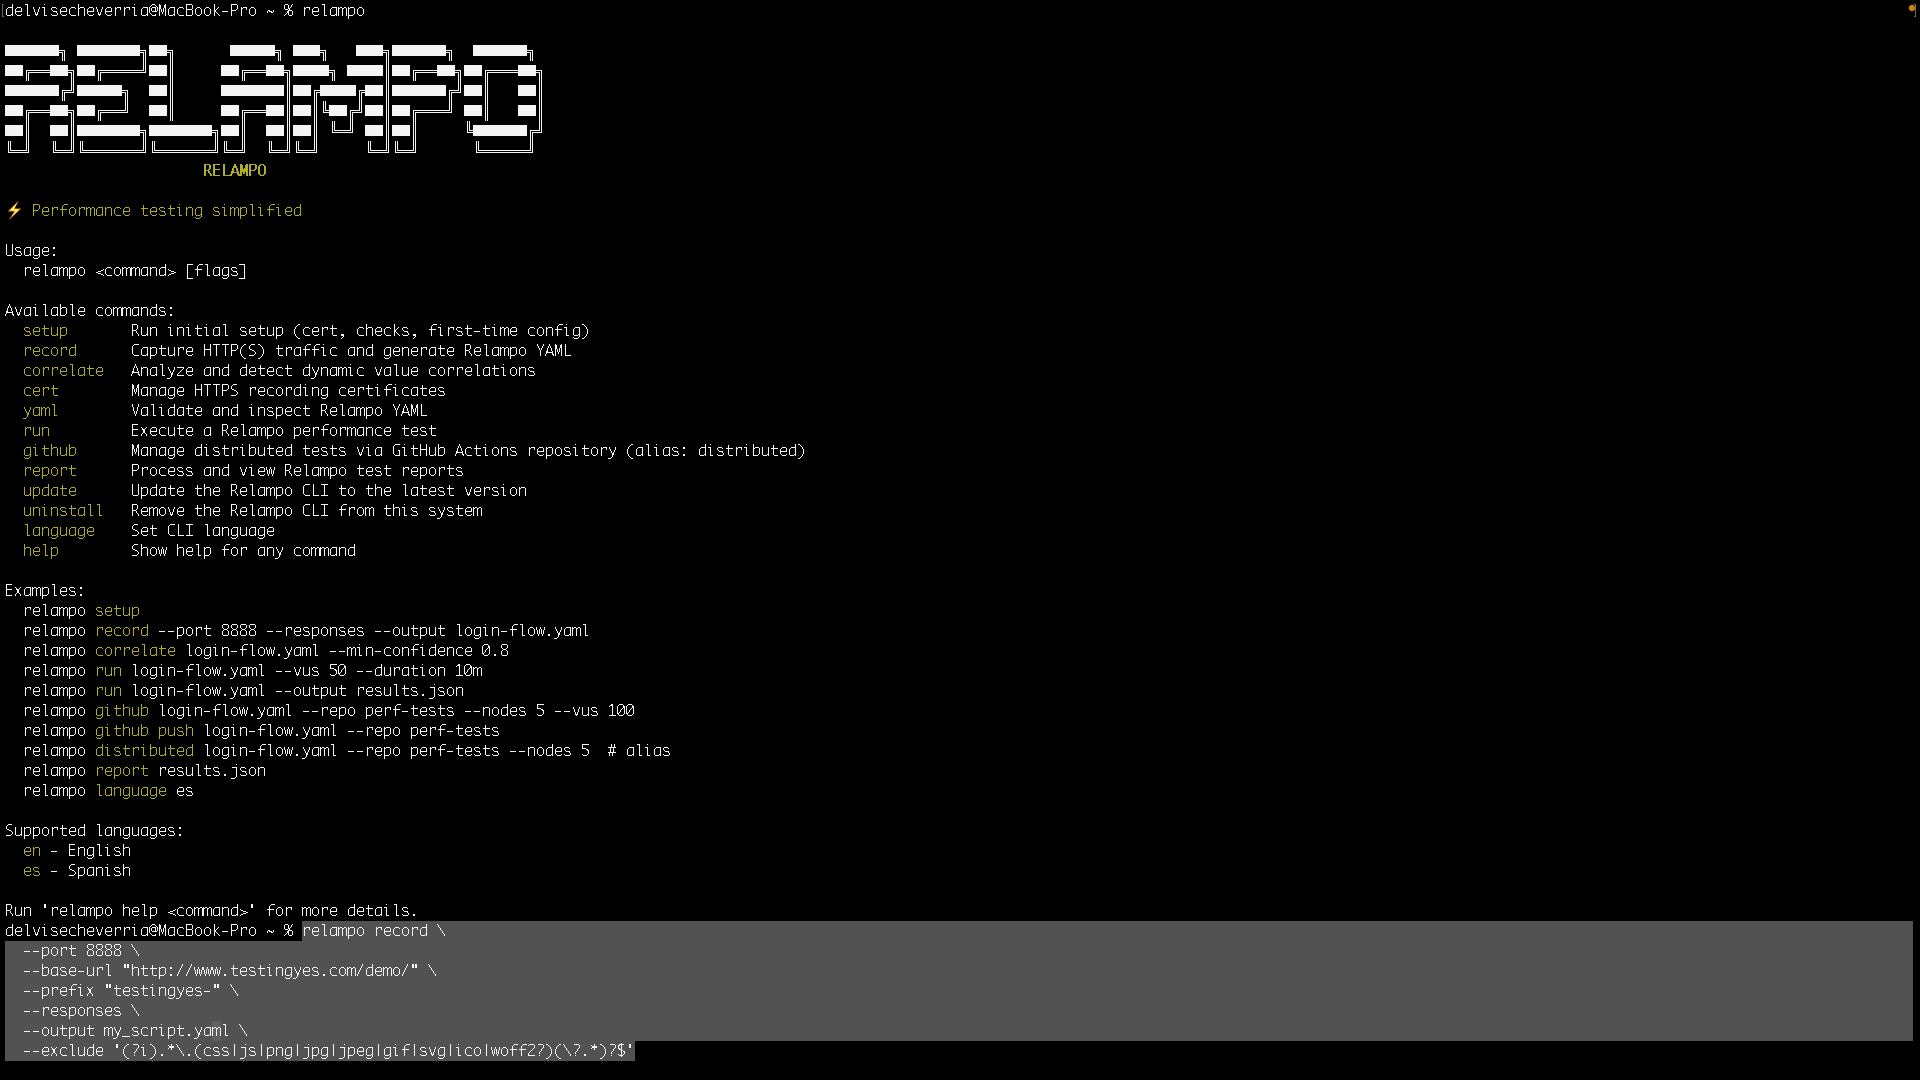
Step 1. Start recording
relampo record \ # Starts HTTP(S) traffic recording
  --port 8888 \ # Local MITM proxy port
  --base-url "http://www.testingyes.com/demo/" \ # Base URL of the app under test
  --prefix "<optional-prefix>" \ # Optional initial prefix (you can also set it interactively)
  --responses \ # Captures responses (headers/body) for later correlation
  --output my_script.yaml \ # Output YAML file
  --exclude "(?i).*\.(css|js|png|jpg|jpeg|gif|svg|ico|woff2?)(\?.*)?$" # Excludes static resources
The copy button copies only the clean command, without the explanatory comments shown in the example.
Expected result: Once you press Enter, you should see the following.
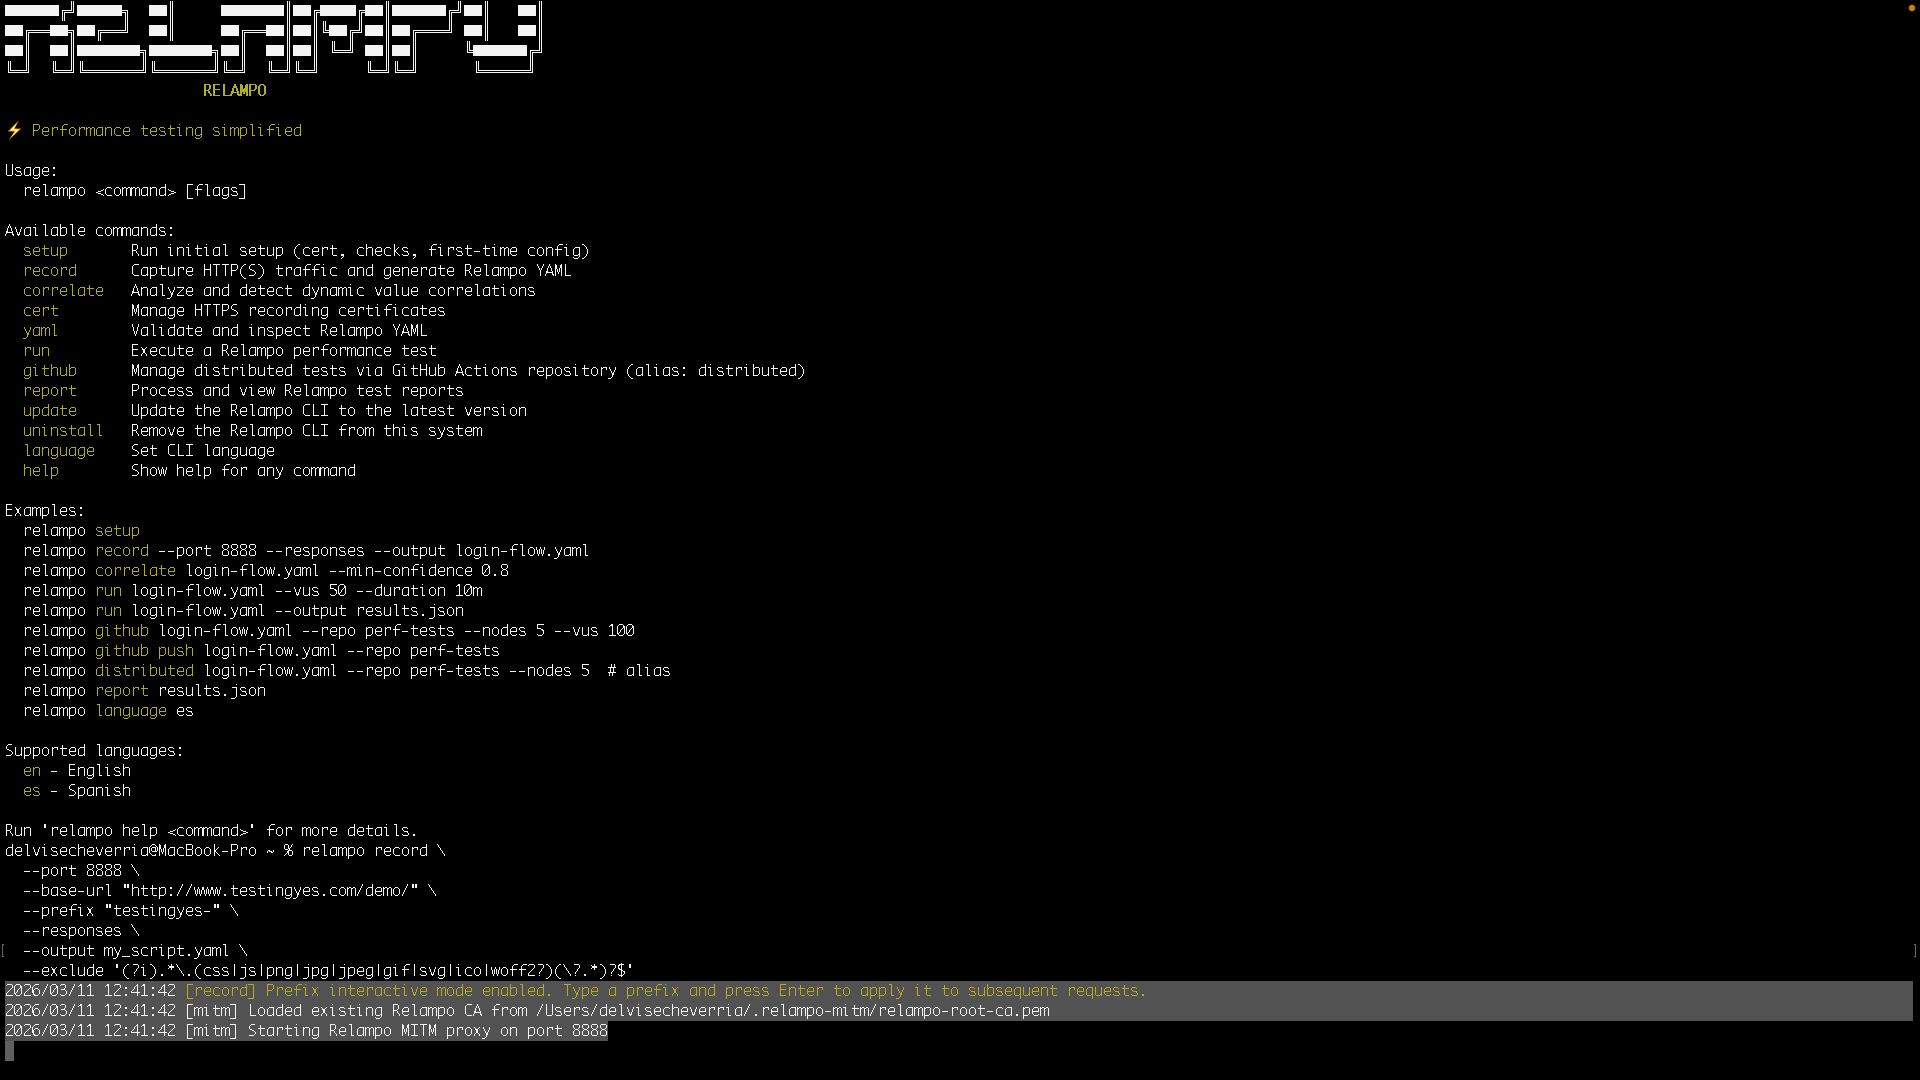
Prefix interactive mode enabled...Starting Relampo MITM proxy on port 8888
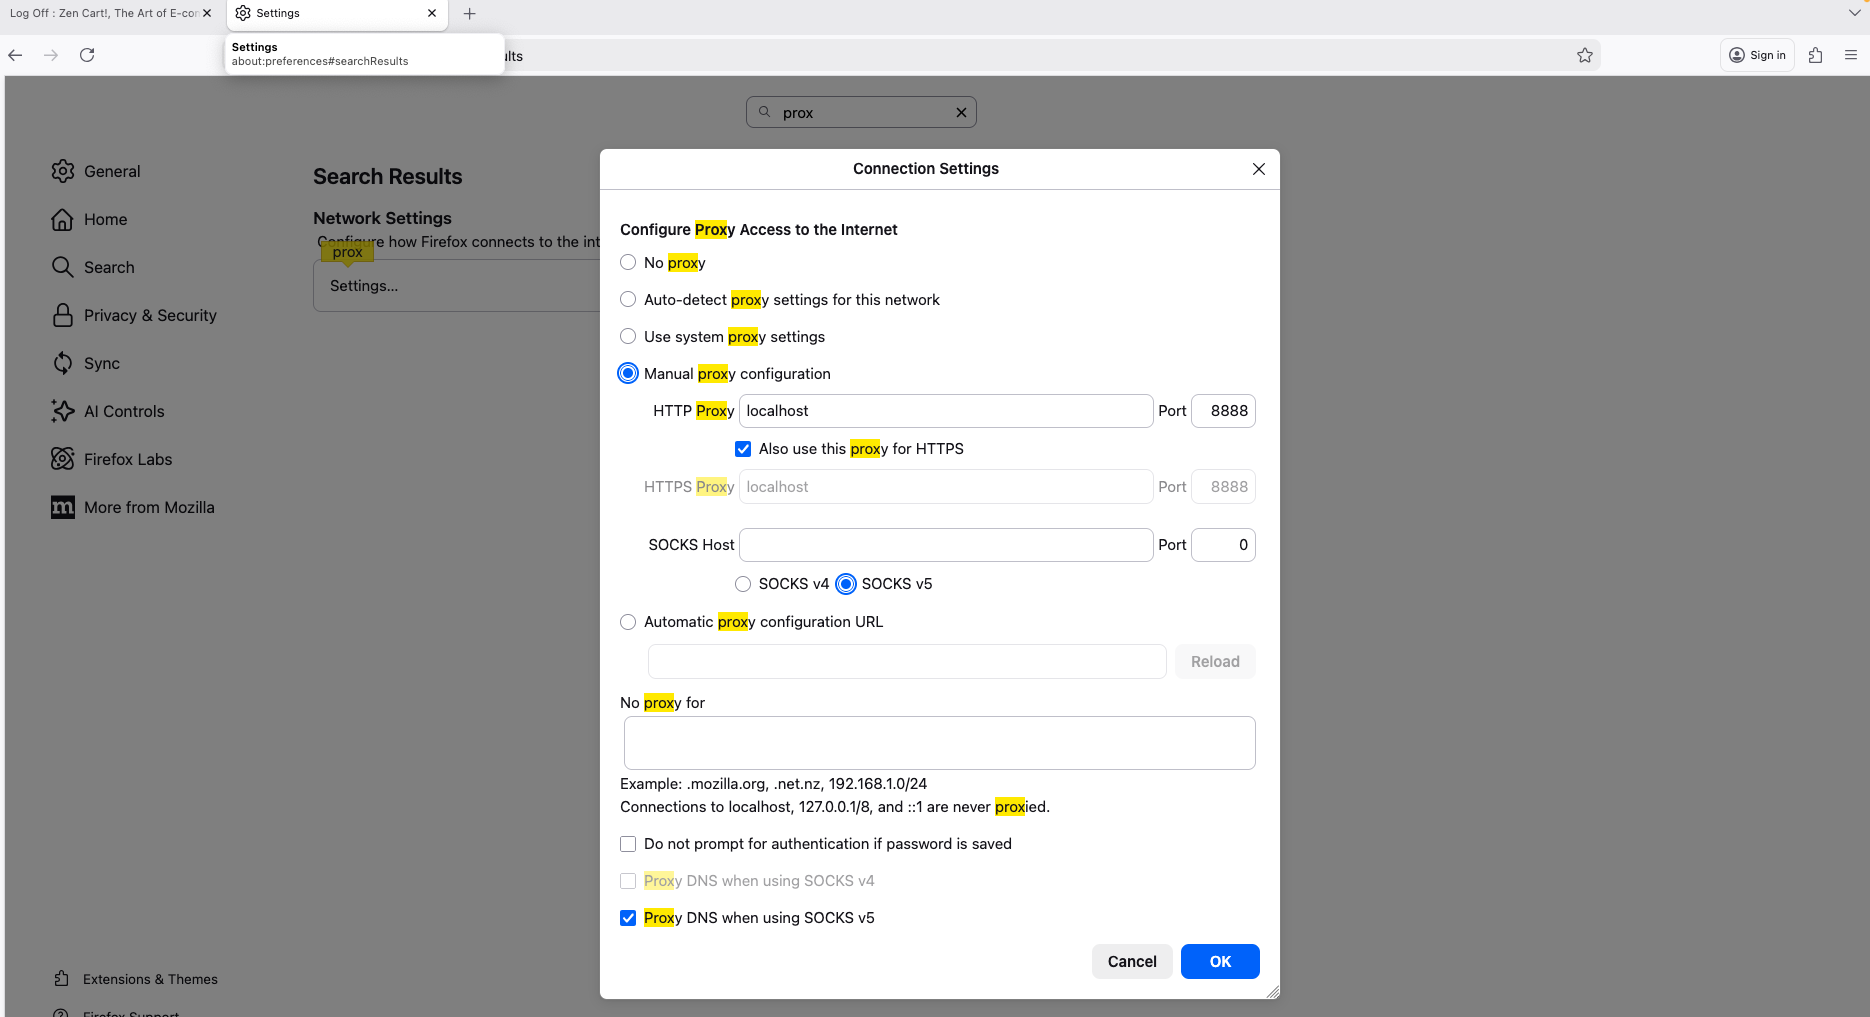
Step 2. Configure Firefox proxy
- Open
Settings > Network Settings > Settings... - Select
Manual proxy configuration - Host:
localhost - Port:
8888 - Enable
Use this proxy server for all protocols
Step 3. Execute the functional app flow
Before starting the functional app flow, you can add prefixes to each request to name them and map user actions to captured requests.
How it works: before each action in the web app, type in the terminal how you want to name that group of requests, then press Enter.
Keep in mind this feature is enabled when you run relampo record with --prefix, as shown in this example.
For example, you can type in the console:
HOMEPAGE
In the console, you should see:
HOMEAPAGE
2026/03/11 13:39:53 [record] Updated prefix from stdin: "HOMEAPAGE"
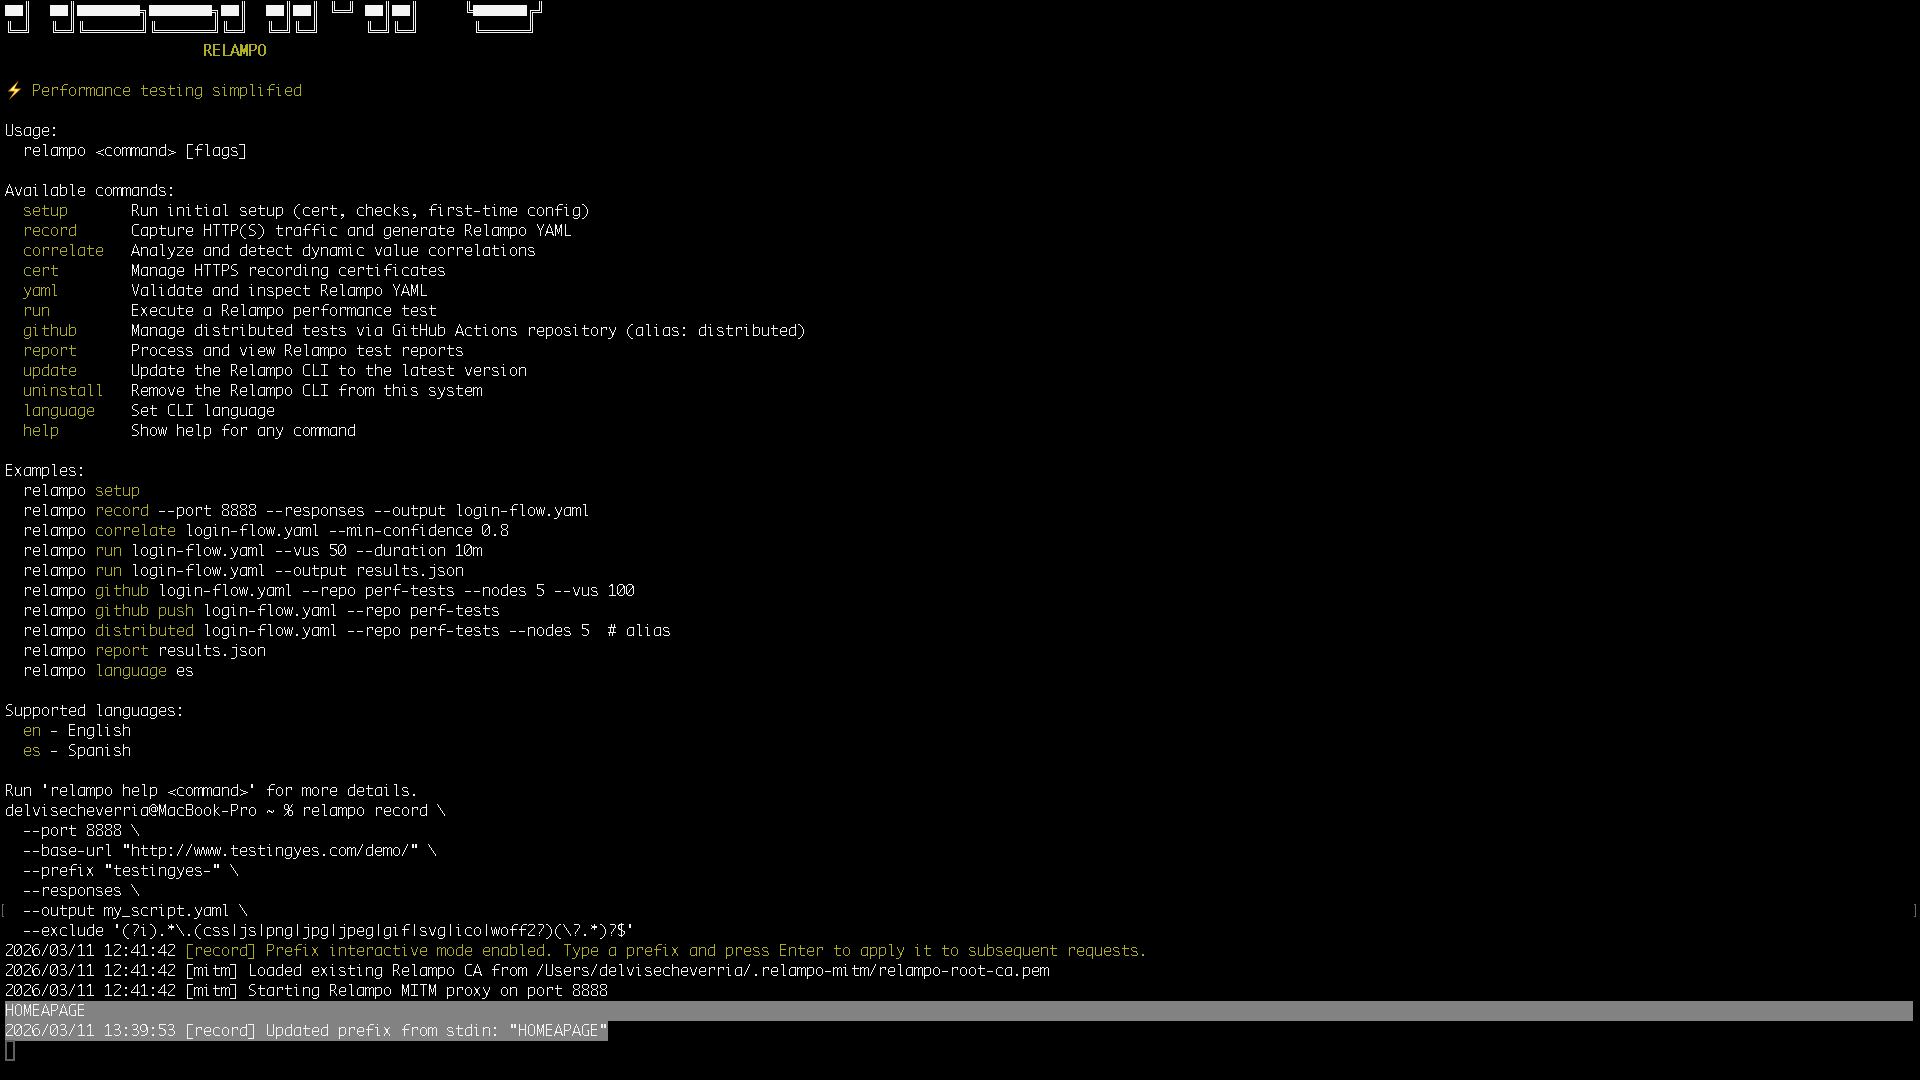
Now you can go to the web app home page: http://www.testingyes.com/demo/
If you go back to the Relampo console, you will see the first recorded requests:
2026/03/11 13:44:06 [mitm] HOMEAPAGE - GET /demo -> 301 (160.96075ms)
2026/03/11 13:44:07 [mitm] HOMEAPAGE - GET /demo/ -> 200 (491.15775ms)
Do the same for the rest of the flow steps:
Each request should be recorded with its corresponding prefix:
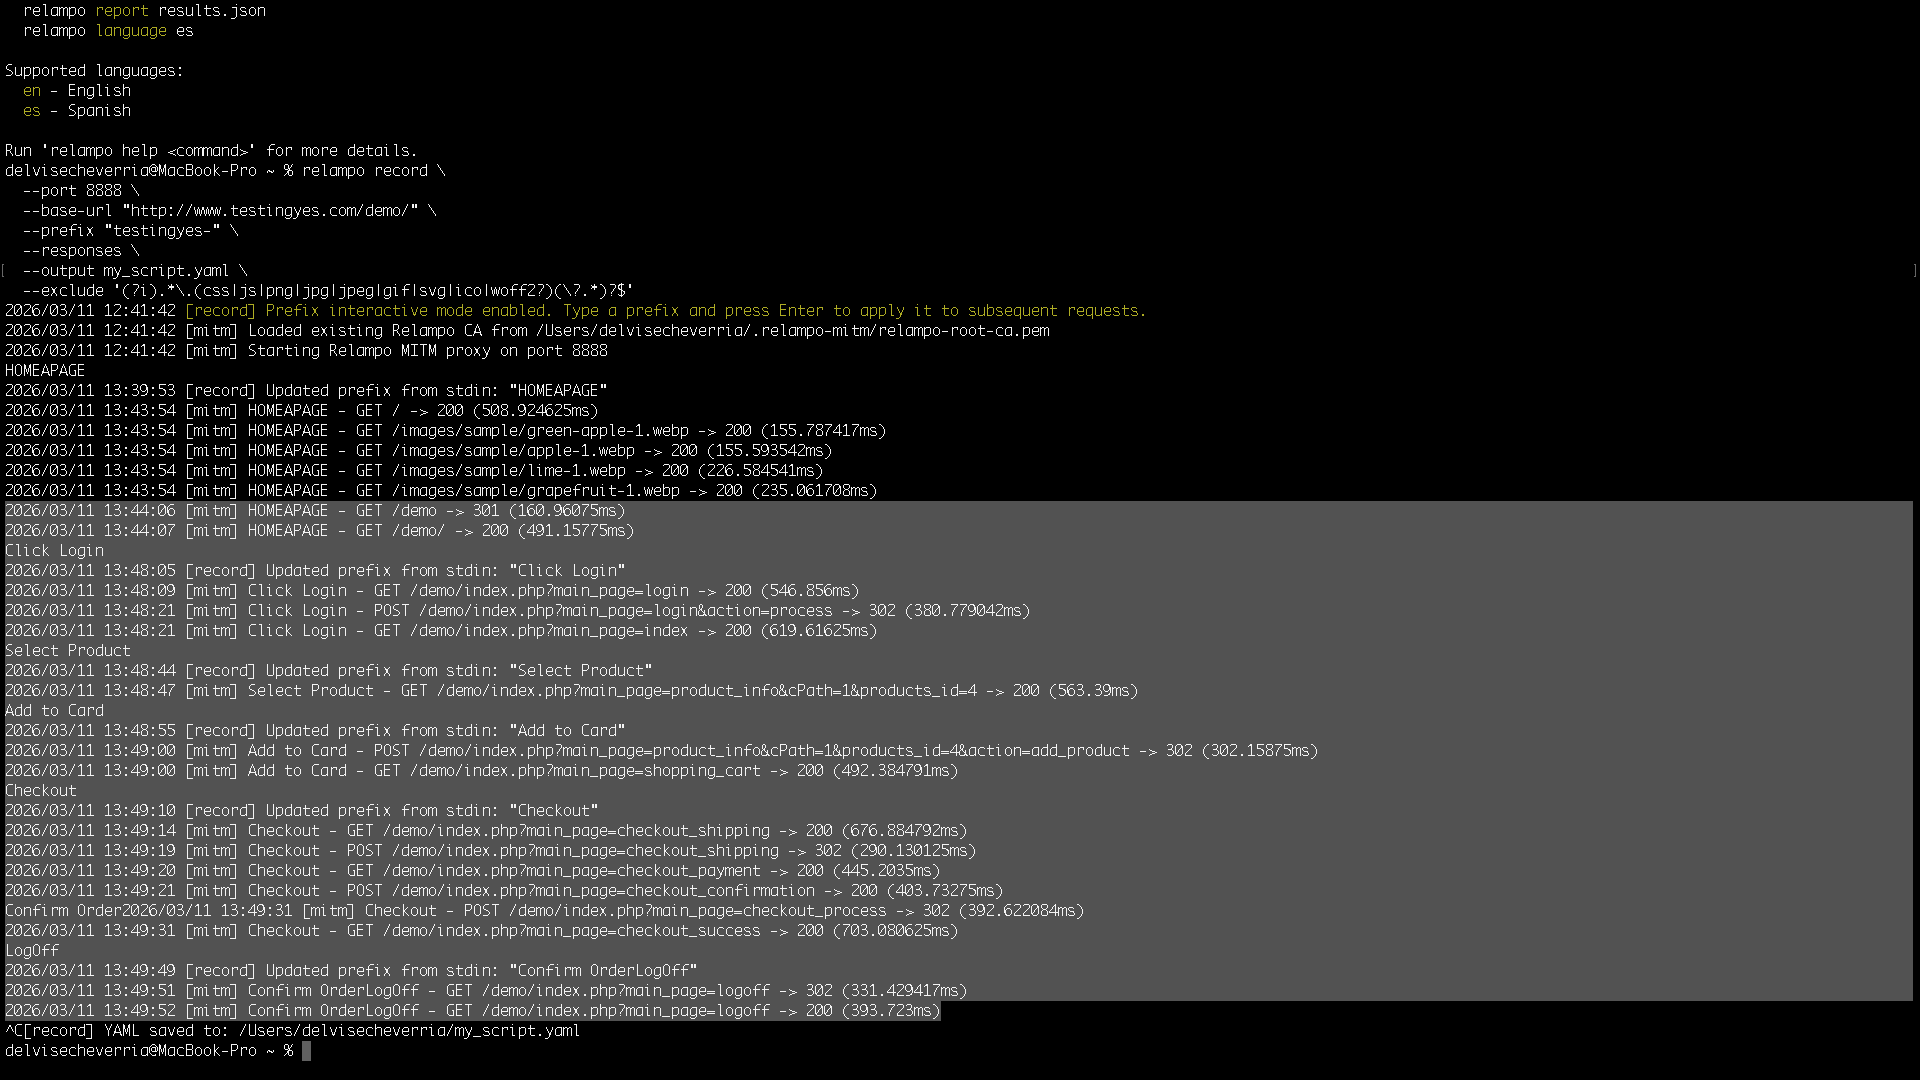
- HomePage
- Click Login
- Sign In (credentials provided by the Relampo team)
- Select product
- Add to cart
- Checkout
- Confirm Order
- LogOff
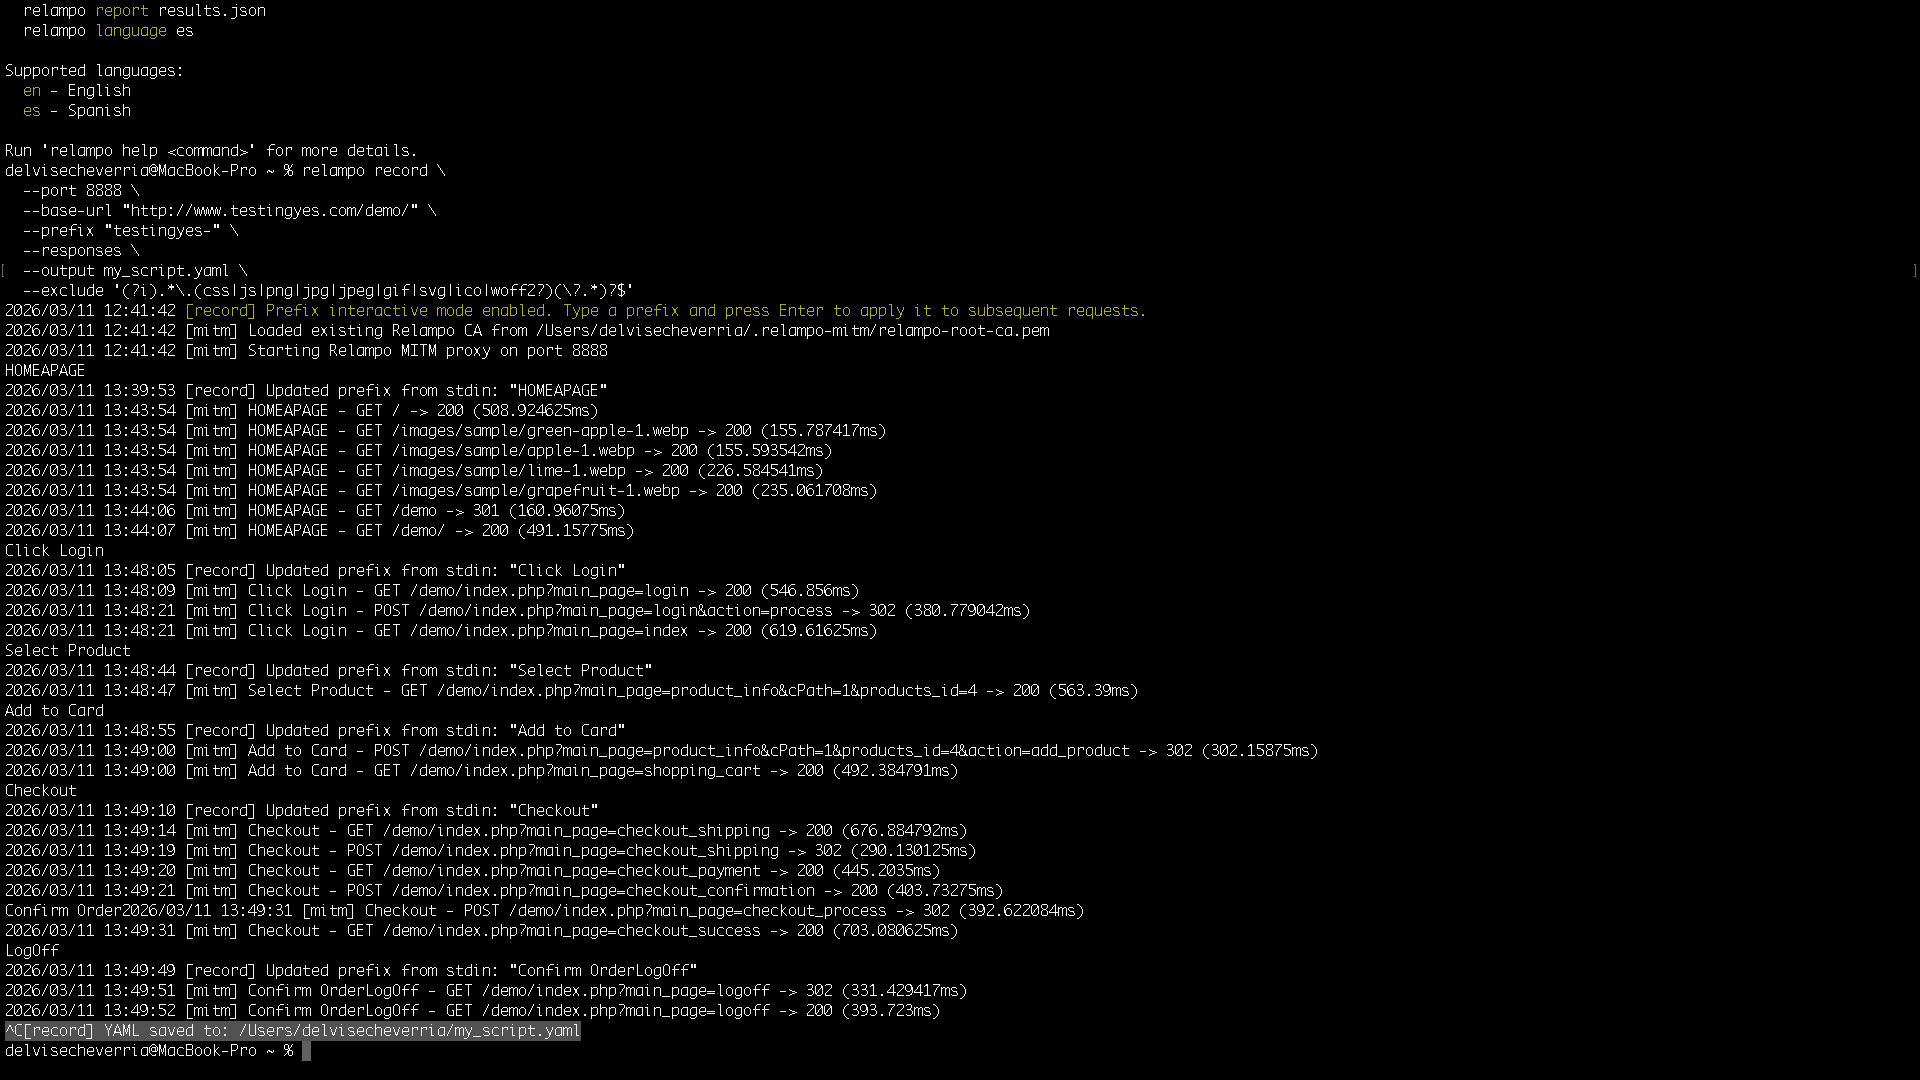
Step 4. Finish recording
Press Ctrl + C in the terminal.
Expected result:
2026/03/11 13:52:10 [record] YAML saved to: /Users/delvisecheverria/my_script.yaml
We now have a recorded script, and in this case we also captured responses.
Download it here: Download my_script.yaml
2) Correlation analysis
Now that we have our script recorded with Relampo and, in this case, we kept responses, we can run a first analysis to detect dynamic values present in the script.
To do that, run:
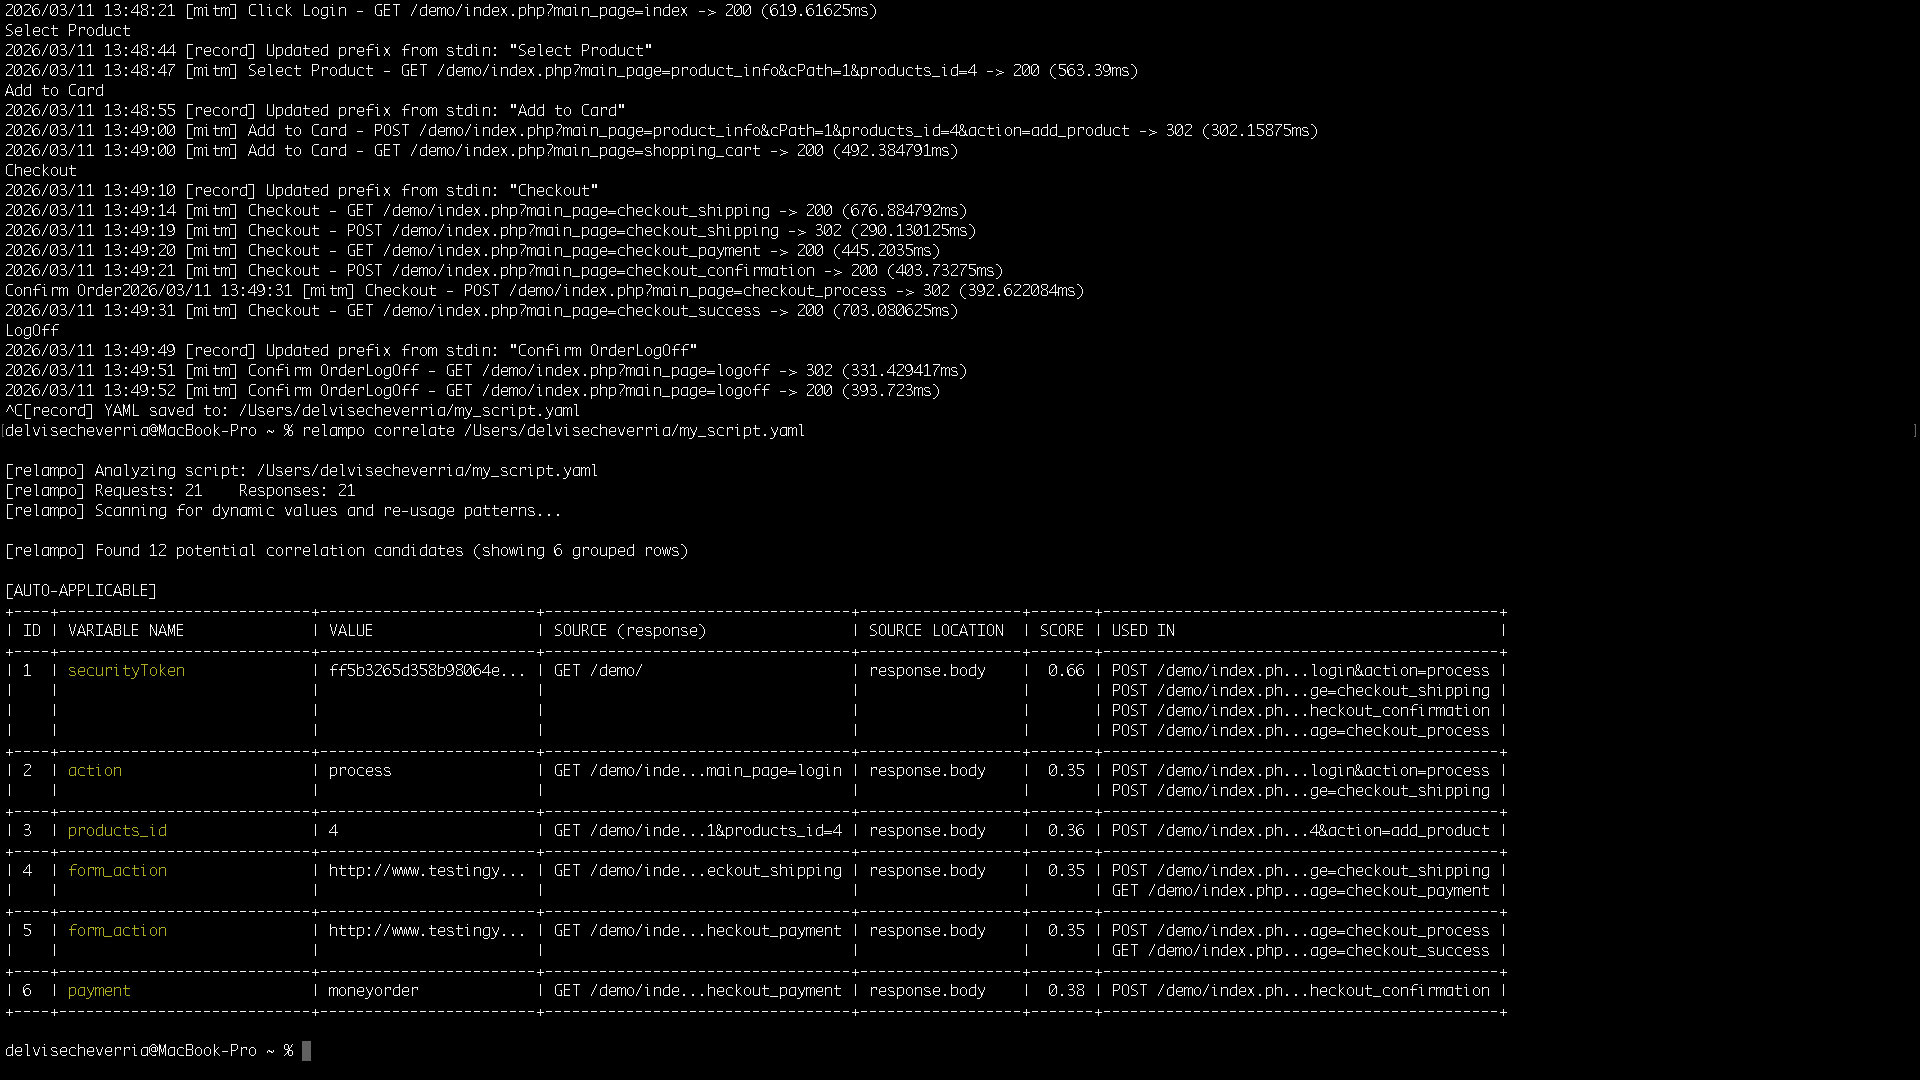
relampo correlate /Users/delvisecheverria/my_script.yaml
Expected result:
- Relampo shows a table with potential correlation candidates.
- The table includes:
ID,VARIABLE NAME, and associatedVALUE. SOURCE (response)shows where the server sent the value (for example: headers, URL, body, etc.).USED INshows in which request that value is sent back to the server.
3) Apply correlation
Once Relampo shows correlation candidates, you can decide which values to apply.
- If you want to apply all candidates:
relampo correlate /Users/delvisecheverria/my_script.yaml --apply - If you want to apply only specific IDs:
relampo correlate /Users/delvisecheverria/my_script.yaml --apply-ids "1,3"
--apply-ids can receive individual IDs, ranges, or both. These forms are equivalent for Relampo: --apply-ids 1,3, --apply-ids "1,3", --apply-ids 1-3,5, and --apply-ids "1-3,5". Quotes are optional and only make the value explicit for the terminal.
For this case, we will use IDs 1 and 3 (securityToken and products_id):
relampo correlate /Users/delvisecheverria/my_script.yaml --apply-ids "1,3"
Expected result:
[relampo] Analyzing script: /Users/delvisecheverria/my_script.yaml
[relampo] Requests: 21    Responses: 21
[relampo] Scanning for dynamic values and re-usage patterns...

[relampo] Applied correlations:
  securityToken | (?is)(?:var|let|const)\s+securityToken\s*=\s*["']([^"']+)["'] | Regex Extractor | APPLIED
  products_id | (?is)<input[^>]*name=["']products_id["'][^>]*value=["']([^"']+)["'] | Regex Extractor | APPLIED
✓ Correlated YAML written to /Users/delvisecheverria/my_script.correlated.yaml
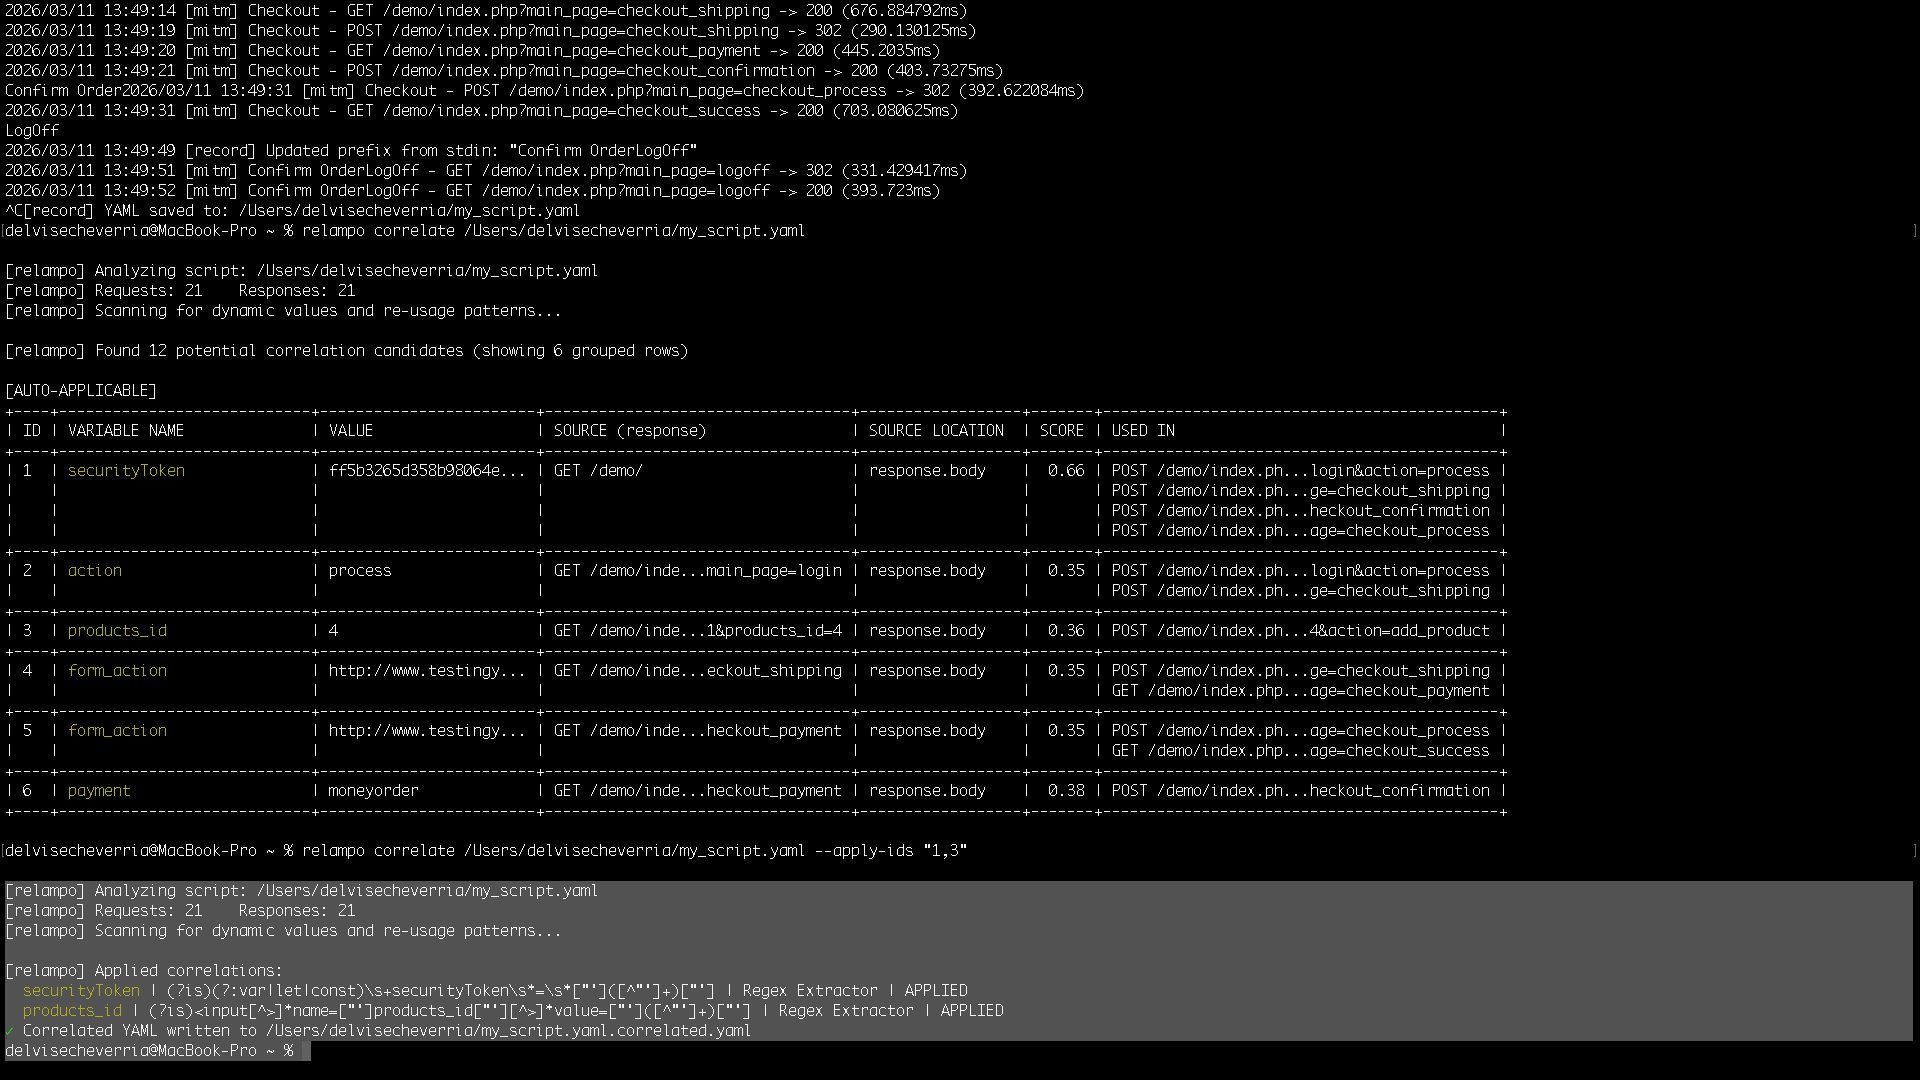
Relampo generates a new correlated script, with the created extractors and variable substitutions in the requests where values are sent back to the server.
We now have a correlated script with extractors and variable substitutions already applied.
Download it here: Download my_script.correlated.yaml
4) Edit in Relampo Editor
relampo studio /Users/delvisecheverria/my_script.correlated.yaml
At this point, we already have a correlated script with values identified automatically by Relampo.
Now you can open Relampo Studio to review the generated script and extend it with additional runtime configuration.
You can do it in two ways:
- From terminal with
relampo studio /Users/delvisecheverria/my_script.correlated.yaml. - From web at
editor.relampo.com, loading/Users/delvisecheverria/my_script.correlated.yaml.
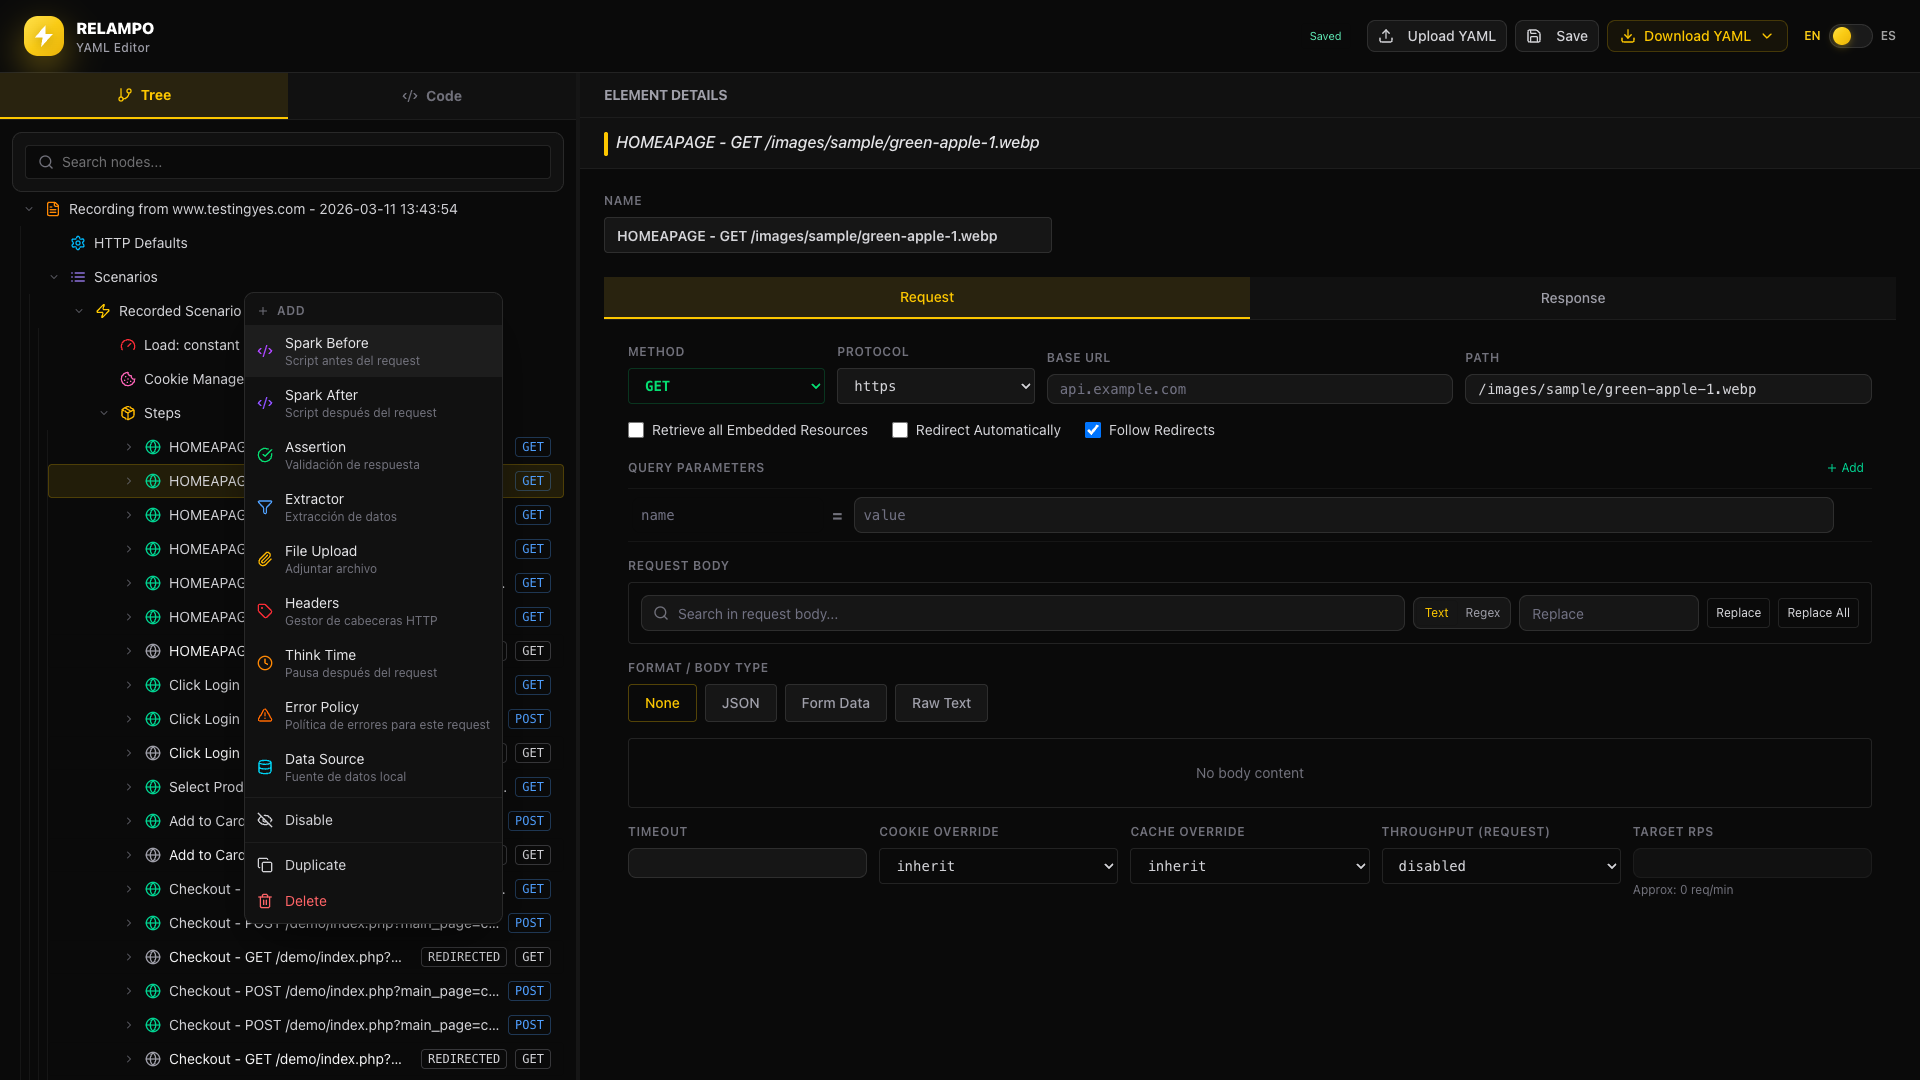
Inside the editor, you can:
- Add manual correlations that Relampo did not detect automatically.
- Configure
scenario.cookies. - Configure
data_source(for example CSV). - Define
think_time. - Add
assert/assertions. - Extend logic with JavaScript using
spark(beforeandafter).
Note: some elements are generated automatically to speed up script editing.
Your script can be viewed both as a node tree and as code.
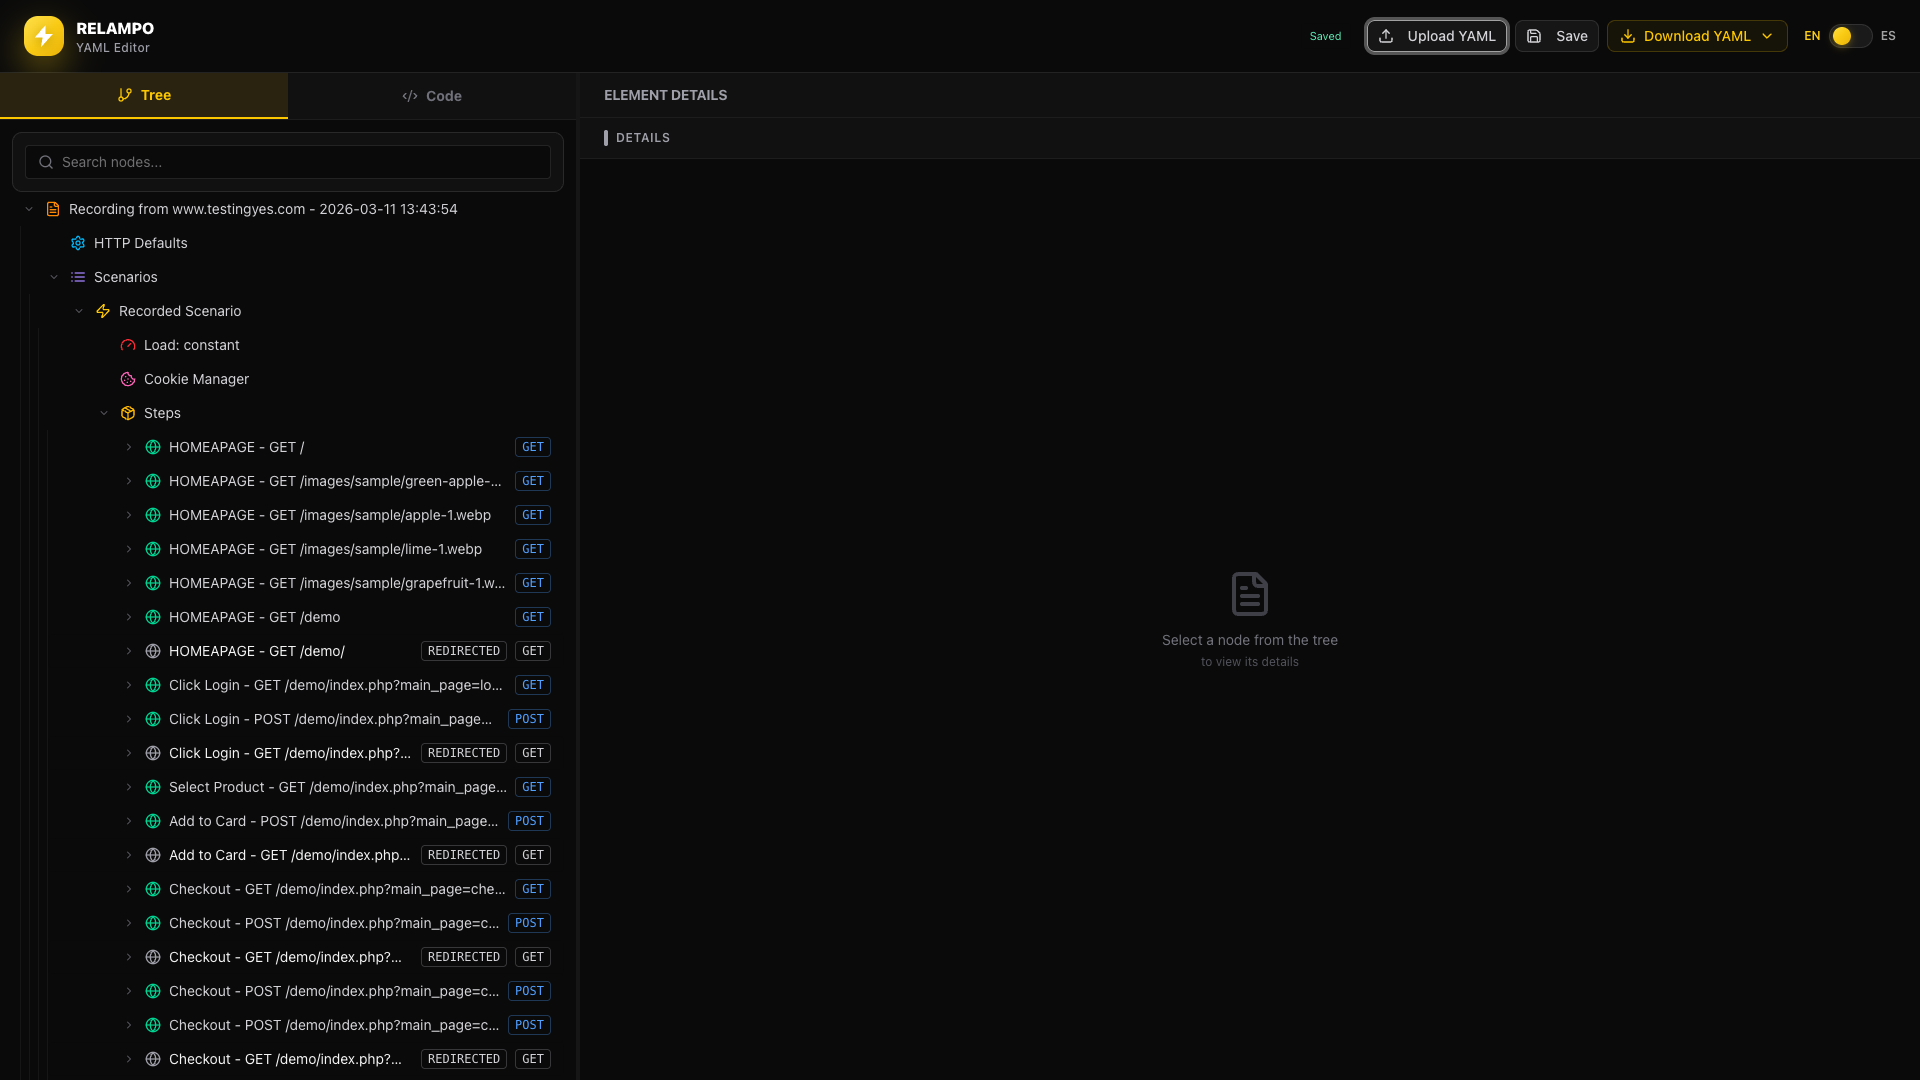
Feel free to add all elements your script needs to make your performance scenario as realistic as possible.
As an example, here we are adding:
think_timeassertions- a
spark afterexample to capture a token with JavaScript - a
data_sourceusing an external file (emailandpassword) for login
Run an edited example script
If you want to run an edited script with some of these elements already configured, you can download this script.
This script includes:
data_sourcewithusers.csvto feed different login credentials per iteration (emailandpass).- Dynamic login payload driven by variables (recommended:
email_address={{email}}andpassword={{pass}}). - Correlation extractors for
securityTokenandproducts_id. spark afterJavaScript to capturesecurityTokenfrom the response and storeSecuritytoken_Spark(for visibility/example use).think_timebetween requests using mixed pauses (fixed and ranged), keeping pacing under 5s.- Multiple assertions (
status,contains,response_time,regex,not_contains,response_size) to validate behavior and detect failures early.
Download it here: Download ScriptEdited.yaml
Expected result:
- Script refined and saved with complete runtime configuration.
5) Debug flow
relampo debug /Users/delvisecheverria/my_script.correlated.yaml
Expected result:
- Visual Debug view opens in Studio.
- Dynamic variables resolved correctly.
6) Local run
relampo run /Users/delvisecheverria/my_script.correlated.yaml
Expected result:
- Local execution completed with metrics.
7) Distributed run
7.1 Prepare distributed repository
Setup command:
relampo distributed setup
Or with a specific repository:
relampo distributed setup --repo owner/perf-tests
Expected result:
- Remote repository prepared for distributed execution.
7.2 Upload test files
Before running distributed tests, upload the scenario and required data files (such as CSV files).
--files must be a bracketed list:
relampo distributed files upload \
  --repo owner/perf-tests \
  --files "[/Users/me/test.yaml,/Users/me/users.csv]"
On Windows, replace \ with PowerShell backtick (`) or CMD caret (^). You can also run this command in a single line.
Expected result:
- YAML script and CSV data available in the distributed repository.
7.3 Execute distributed run
Recommended entry command:
relampo distributed run /Users/me/test.yaml \
  --repo owner/perf-tests \
  --nodes 2 \
  --vus 10 \
  --duration 2m \
  --json /Users/me/Downloads/distributed-summary.json \
  --html /Users/me/Downloads/distributed-summary.html \
  --csv /Users/me/Downloads/distributed-summary.csv \
  --text /Users/me/Downloads/distributed-summary.txt
On Windows, replace \ with PowerShell backtick (`) or CMD caret (^). You can also run this command in a single line.
You can monitor execution from GitHub Actions while the test is running, or wait locally for the summary output. You can also review the generated HTML report and logs in JSON, TXT, and CSV formats.
Expected result:
- Multi-node execution completed with aggregated results.